Your News

It's not just rotting teeth and obesity you're risking: From dementia to liver damage, the real toll of too much sugar

Mince pies, pudding and brandy butter, chocolates, - Christmas truly is the season of sugar. The average British adult will consume the equivalent of 32 teaspoons of the stuff on Christmas Day alone, according to the British Heart Foundation. UK guidelines recommend that we should have no more than 50g - or around ten teaspoons - of sugar a day. But surveys suggest the average British adult goes over this by two teaspoons - much of this coming from sugars added to our food by manufacturers.
And sugar does more than rot your teeth: in recent months many experts have argued that it's sugar, not fat, that's to blame for our obesity epidemic. Yet sugar is not just full of calories. Some scientists are claiming that, calorific content aside, a sugary diet is harmful because it alters crucial processes and hormone levels in the body. So can we safely indulge our sweet tooth over the Christmas period? Dr Mark Vanderpump, an endocrinologist at the Royal Free Hampstead NHS Trust in London, says that while most healthy people can get away with the odd sugar binge, there is 'quite a large population in this country who are on the borderline of diabetes, and if they put enough pressure on the system, it may just tip them over the edge'.

Why You Should Never Peel An Apple

Part of what makes an apple the ultimate healthy snack is the ease with which you can wolf one down. The only thing between you and digging in is basically a careful wash. But a picky eater or two have certainly been known to require a little more fussing before the first bite of an apple, namely removing the skin. Whatever the excuse -- maybe you don't like the texture or the taste -- you're plain and simple not getting all an apple has to offer by peeling it
first. Here are some very powerful reasons to never remove the skin again. The skin packs most of the fiber.
A medium apple with the skin contains 4.4 grams of fiber. Without the skin, you're only getting 2.1 grams, not even enough to qualify it as a "good source of fiber" (the cutoff is 3 grams). The skin also packs most of the vitamins. That same medium apple with skin packs 8.4 milligrams of vitamin C and 98 international units (IU) of vitamin A. Ditch the skin and that falls to 6.4 milligrams of vitamin C and 61 IU of vitamin A. Apples can ease breathing problems -- but only if you eat the skin.
The compound responsible is called quercetin, and -- you guessed it -- it's found mostly in the peel. One study found that people who eat five or more apples each week have better lung function thanks to quercetin's effects, Health.com reported. Quercetin also protects your memory. The antioxidant seems to fight off tissue damage in the brain linked to Alzheimer's disease and other degenerative problems -- at least in rats, according to a 2004 study. The skin may also keep cancer at bay.

How To Cook Perfect Steak in the Oven

How To Cook Perfect Steak in the Oven
One of our favorite summer meals is steak from the grill. But many of us simply do not have access to a grill, at least not on a daily basis. If you're craving that quintessential taste of summer cook-outs, the taste of a juicy steak with crisp, peppered crust, we have you covered. No, you don't need a grill; yes, you can make a perfect steak indoors.

Here is an absolutely foolproof, easy, and quick way to make a steak indoors, in the oven. Add a loaf of bread, a salad, and a bottle of wine, and you have an easy and delicious meal. No grill required.
2010_02_10-Steak.jpg
This method takes 15 minutes, tops. Have the rest of your meal ready, the candles lit, and the wine poured before you start cooking. (Although you should probably heat the broiler at least 20 minutes before you need to cook.) It turns out a beautifully juicy, medium-rare steak, with crisped and crunchy edges, and so much flavor! This is probably our favorite way to cook a steak, honestly; it is even easier than grilling.

How To Cook Perfect Steak in the Oven

• This method is adapted slightly from Alton Brown's Pan-Seared Rib Eye recipe.
• Yield: One pound of steak is plenty to feed two people. In fact, I've served four people on just one pound of boneless rib eye. One pound of bone-in ribeye is enough for a feast for two, with a little left over for lunch the next day.

What You Need

Ingredients
One approximately 1-pound ribeye steak, 1 to 1 1/2 inches thick
Canola or vegetable oil
Kosher salt
Freshly ground black pepper
Equipment
Cast iron skillet
Long tongs
Very thick or well-padded oven mitt

Instructions

1. The first, and most important, step in cooking a great steak is to buy a great steak. The best way to do this is to go to a local butcher, preferably one who either raises the animals himself or sources them from a local farm. The beef should be at least partially grass-fed and humanely butchered. Look for steaks that have been dry-aged to intensify the flavor, too. I buy my steak from a butcher at my local market; they raise the animals on a farm nearby and dry age the beef for at least a couple weeks. (I love Bluescreek Farm Meats, my local butcher! There is always a difference in taste when buying from good folks like them.)
2. Buy a rib eye steak. It should be at least 1-inch thick and have some fat marbling around the edges. Again, buy the best you can. No matter how expensive it is, it will still be cheaper than eating out on Valentine's Day! Expect to pay at least $10 to $15 for a pound of steak. If it is less than that, pass it up. I live in the Midwest, so prices aren't too bad here. If you're in the city, you should probably expect to pay at least $20 per pound. 1 pound of steak will easily feed two, and can be stretched to three or even four people.
3. Now that you have your rib eye steak, open the package and drain out any juices. Blot the steak dry with paper towels or a rag. Let the steak come to room temperature, if it isn't already.
4. Turn on your oven's broiler and place an oven rack 6 to 8 inches below the broiler element. Put a cast iron skillet on the rack to heat up with the oven.
6. Pour a little canola or vegetable oil (about 2 tablespoons) into a small bowl.
7. Put about 1 tablespoon of kosher salt into a ramekin and mix in a generous amount of freshly ground black pepper.
8. Brush the oil all over the steak, coating it generously on both sides and on the ends.
9. Now sprinkle the salt and pepper mix generously on both sides of the steak, patting it into the steak so it sticks.
10. Turn on a stove burner to high heat.
11. Very, very carefully remove the hot cast iron skillet from the oven, using your thickest and most reliable oven mitt or pad! Place it over the high heat and use long, sturdy kitchen tongs to place the steak on the hot pan. It should sizzle immediately.
12. Cook the steak for 30 seconds, then flip it over.
13. Cook the steak for an additional 30 seconds on the other side. Then, again carefully, put the skillet and steak back in the oven. Cook the steak for 2 minutes. (Don't forget to turn off the burner) Open the oven and carefully flip the steak, using the long tongs. Return to the oven and cook for an additional 2 minutes. At this point your steak will be medium-rare (as seen in the photos). If you prefer your steak closer to medium, add 2 minutes to the oven time.
14. Take the steak out of the oven. Turn off the oven. Remove the steak from the pan and put it on a large cutting board. Cover it with aluminum foil and let the steak rest for about 5 minutes.
15. Slice the steak against the grain and fan slices out on each plate. Serve immediately.
Additional Notes: 
• If you wish, you can also make a pan sauce with the drippings from the steak. To do this, put the skillet over medium heat while the steak is resting. Add about 1/2 cup of beef or chicken broth, and about 1/2 cup of red wine. Bring to a boil, lower the heat, and simmer until it is reduced by at least half. Scrape up any small bits of meat still clinging to the skillet. Pour the reduced sauce over the sliced steak on each plate before serving.

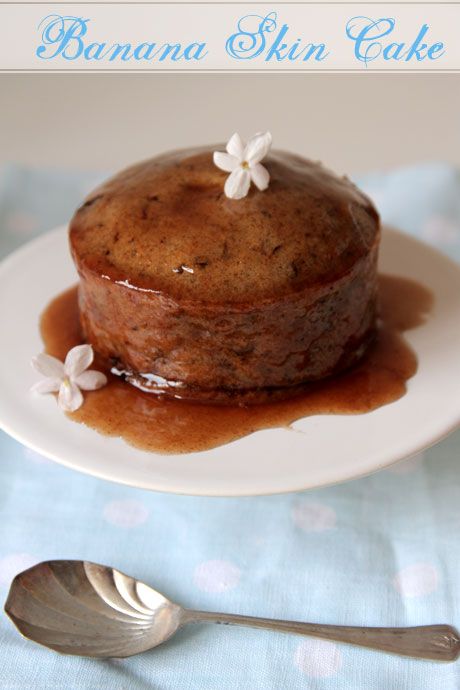
Banana Skin Cake. Yes, really!

Banana Skin Cake. Yes, really!
banana skin cake recipe
One thing I am rather adamant about is wastage, especially food. I hate to throw things away and luckily I have a man-sized garbage disposal in the shape of Mr NQN. He eats most things. One thing of course that one generally
doesn't eat is banana skins. Until he told me about a television show on SBS that featured a woman who makes a cake from banana skins. Yes banana skins!
banana skin cake recipe
I was skeptical. I mean, banana skins are usually the kind of thing that you avoid with a vengeance. Once they're off the banana their smell is so strong, I can't wait to get the garbage out of the house so the idea of baking with them seemed completely at odds with my olfactory senses. As instructed, I soaked the skins for days. The smell on the first day was quite strong but by the second and third day they didn't smell like anything at all. I only used three skins-I didn't want to waste too many ingredients if it turned out to be unpalatable.
banana skin cake recipe
I followed the instructions and blended them and them mixed them in like a regular cake ingredient and then set about making the jam topping. Jam is really a misnomer for it. It's like a liquidey caramel topping with an unusual push and pull viscous texture rather than a thick jam. Once the cake was baked, I poured the sauce over it and brought it along to a gathering with some of Mr NQN's family. I knew if anyone would appreciate a banana skin cake, it was them.
Banana Skin Cake. Yes, really!
"I'd like you to try this cake and tell me what you think of it" I told them. "What is it?" they asked and I answered "I'll tell you afterwards, I want to know what you think of the taste". There were some skeptical glances but they seemed happy to trial it. I tried a piece too and it was delicious. Similar to a bread and butter pudding in texture crossed with a sticky date pudding, it was liked by all that tried it, especially with the sauce. And would I make it again? Absolutely! As Edna described it "It is luxury made from rubbish".
So tell me Dear Reader, would you try this cake if you knew it contained banana skins?

Banana Skin Cake

Recipe adapted from Edna Toledo
Ingredients
  • 4 to 6 banana skins (orange skins or other fruit peels can also be used)
  • Water
  • Eggs
  • Granulated sugar
  • Salt
  • Oil
  • Self-raising flour
  • Yeast
  • Cinnamon
Method
banana skin cake recipe
Step 1 - Cut off the ends of the skin. Leave the skins soaked in water, changing the water every day, until they become soft and water is clear. Process the skins in a blender or food processor with enough water to help the blender cut them up. I used 1/2 cup of water for 3 banana skins.
banana skin cake recipe
Step 2 - Strain the mixture to get rid of any hard bits, but retain the puree and the liquid.
banana skin cake recipe
Step 3 - Line a cake tin with baking parchment-for the three banana skins I used a round 11cms tin but double that adjust  it according to how many banana skins you use. Measure the amount of puree mixture in a cup and for every cupful, add one egg,  3/4 a cup of sugar, one teaspoon of salt and half a cup of oil. Beat until well incorporated.
banana skin cake recipe
4.  Add one cup of flour and one tablespoon of yeast, per cupful of the original puree, and mix. Place batter into the prepared baking tin
Step 5 - Bake in a moderate oven (180C, 350F, Gas Mark 4) for 40 minutes or until it looks ready and a skewer inserted comes out clean.
banana skin cake recipe
The sauce boiling and reducing
banana skin cake recipe
To become a thick syrup
banana skin cake recipe
Step 6 - Meanwhile use the strained liquid part to make a glaze. Measure the amount in a cup, then for every cupful, add a cup of sugar into a pan with the liquid. Add cinnamon and a pinch of salt and heat. Stir to avoid sticking until thickened enough to spread on the cake. It will become quite viscous and I boiled mine for about 25 minutes. Cool slightly.

How to Cook Ugali without Sticking on the Pot

How to Cook Ugali without Sticking on the Pot
ugali-sukumawiki-kenya
Ugali is a staple food of many African countries including Kenya.
Ugali is cooked by mixing either maize, sorghum or millet flour with water and cooking until it forms homogeneous mass.
Ugali pepared from maize flour is white in colour while Ugali prepared from millet or sorghum is brown.
The main nutrient in Ugali is carbohydrate i.e. starch.

There is a big problem encountered during cooking of ugali. The flour used (either maize, sorghum or millet) sticks on the inside surfaces  of a cooking pot. This requires a lot of difficult work to clean the cooking pot.
In this article, I will outline steps to make ugali that doesnot stick on the cooking pot
Process of making Ugali which does not stick to the sauce pan
Ingredients
1/2 kg of maize flour
1/2 litre of water
olive oil
Teflon coated cooking pan

Cooking wooden stick
Steps
1.Put the water into the cooking pan and heat till it boils.
2. Add olive oil (approx 50 ml).  Normally Ugali is cooked without adding oil
2. Add maize flour while stirring to ensure that it is heated and mixed homogeneously.
3. Continue adding flour until it forms a cake.
5. You can control the hardness of the cake by the amount of flour you add into the boiling water.
6. The whole process of coking could take between 8-15 minutes.
7. After attaining the desirable hardness, transfer the ugali to a serving plate.
8. The cooking pot will be left smooth and clean without remnants of ugali sticking.
Ugali sticking on Cooking Pot
Serving options
Ugali can be served with vegetables like kales (sukuma wiki), cabbages, fish or meat.
Advantage of Ugali that does not stick on the pot 
Save enormous time which could otherwise be spent doing tedious work of cleaning cooking pot.

HOW TO PREPARE MEATLOAF

HOW TO PREPARE MEATLOAF


Updated with new photos, from the recipe archive. First posted in 2004.
Why do I love meatloaf? It reminds me of being a kid. Where does one get meatloaf other than at home or at a school cafeteria? When I lived in San Francisco I bought meatloaf already mixed and seasoned from my local butcher. Just mixed in an egg, put it in a loaf pan, and popped it in the oven for an hour. These days I wait for my father to whip up a batch. He makes the Best. Meatloaf. Ever. His trick? He uses a mix of ground beef and pork, but the pork he uses is Italian pork sausage (half sweet, half spicy) instead of plain ground pork. He found the original recipe in an old issue of Gourmet (April 1994) and has adjusted it to his taste (including the sausage substitution) over the years. It takes a little more prep time because of the sofritto base (minced carrots, onions, celery, and garlic), but it is so worth it!

  • Prep time: 20 minutes
  • Cook time: 1 hour, 10 minutes
  • Yield: Serves 4 to 6, with plenty for leftovers for meatloaf sandwiches.
Many meatloaf recipes call for ground veal or pork in addition to ground beef. You might want to experiment with a third each of beef, pork, and veal. If you don't have access to spicy ground pork or Italian sausage, add a pinch of fennel seeds and a half teaspoon of hot sauce to regular ground pork.

INGREDIENTS

  • 2 Tbsp unsalted butter
  • 1 cup of minced onion
  • 1 celery rib, minced
  • 1 Tbsp minced garlic
  • 1 carrot, minced
  • 1/2 cup of minced green onion, including the onion greens
  • 2 teaspoon salt (use 1 1/2 teaspoons if using Italian sausage)
  • 1/2 teaspoon freshly ground black pepper
  • 2 teaspoons Worcestershire sauce
  • 2/3 cup ketchup, divided 1/3 and 1/3
  • 1 1/2 pounds of ground beef (chuck)
  • 3/4 pound of spicy ground pork sausage or Italian sausage (a mix of sweet and hot if you are using links)
  • 1 cup fresh bread crumbs
  • 2 large eggs, beaten slightly
  • 1/3 cup minced fresh parsley leaves

METHOD

1 Preheat oven to 350° F, with a rack in the middle.
classic-meatloaf-1 classic-meatloaf-2
2 In a large, heavy skillet, melt the butter on medium heat until foamy. Add the minced onion, celery, carrot, garlic, and green onions and cook, stirring occasionally, for 5 minutes. Cover the skillet and cook for an additional 5 minutes, until the carrots are tender, stirring occasionally. Add the salt, freshly ground black pepper, Worcestershire sauce, and 1/3 a cup of the ketchup. Cook for 1 more minute. Remove from heat and let cool to the touch.
classic-meatloaf-3 classic-meatloaf-4
3 In a large bowl, use your clean hands to combine the ground beef, spicy ground pork sausage, eggs, breadcrumbs, the cooked vegetables from step 2, and parsley.
meatloaf-5 meatloaf-6

4 Press mixture into a loaf pan with 2-inch high sides, or form the mixture into a free standing loaf and place in a rimmed roasting pan. Cover the loaf with the remaining ketchup.
meatloaf-7 meatloaf-8
5 Bake the meatloaf in a 350°F oven for 1 hour, or until the internal temperature of the meatloaf reaches 155°F. Let rest for 10 minutes. Then gently remove by lifting with a spatula to a serving plate, and slice to serve.

Get the White Out of Baby's First Foods

Get the White Out of Baby's First Foods

baby eating his breakfastAlmost every childcare book offers the same advice about a baby's first solid meal -- start them first on rice cereal mixed with breast milk or formula. This has been received wisdom for 60 years.
But this is because in the 1950's, baby food companies launched an advertising blitz trumpeting the benefits of white rice cereal.
But there is no scientific basis for this recommendation. None at all. And now, concerned about increasing childhood obesity, some pediatricians want to change how babies eat.
If babies are getting used to the taste of highly processed white rice and flour, it could set them up for a lifetime of bad habits.
USA Today reports:
"White rice -- after processing strips away fiber, vitamins and other nutrients -- is a 'nutritional disaster' ... White rice and flour turn to sugar in the body 'almost instantly,' ... raising blood sugar and insulin levels."

HOW TO PREPARE TEA WITHOUT TEA BAGS

Why don't more of us use loose-leaf tea when it makes a better cuppa and is better for the environment?
Economist, environmental campaigner and wife-of-the-governor-of-the-Bank-of-England Diana Fox Carney has taken some stick for getting exercised over the environmental cost of teabags. It may sound trivial to some, but she makes a good point on the waste involved – we use about 55bn teabags in the UK each year – that's about 370,000 tonnes of waste that mostly end up in landfill.

But the question should be, why do we need any kind of bag when loose leaves make better tea? In 1968, only 3% of households in Britain used teabags – a foreign, American invention that went against our love of leaves. Loose leaf tea, on the other hand, has been made for around 3,000 years, and just requires one brilliant bit of kit – a teapot.
I have never understood why so many of us think it's a real hassle to make proper tea, but happily use a cafetiere for coffee. You get better flavour when you allow the leaves room to unfurl as they infuse. No chemicals, no waste and it's really not complicated.
And the waste isn't just limited to the bags. If you're using good tea leaves, you'll find they can be infused several times. Each time you brew the tea, different subtleties of the delicate flavours will be released. In China it is widely believed that the second or third brew of fine tea is the best.
The trick is not to leave the tea leaves to stew once they have been brewed to the desired strength. Straining the tea completely will prevent the leaves from becoming bitter and allow a second and third brew.

Making a perfect cup of tea

Measure out a cup of water and a teaspoon of tea for each person, with one for the pot if you like it strong.
Pour the water from the freshly boiled kettle into the teacup first and then into the teapot – this way the proportions will be perfect – once the tea is brewed all the liquid is poured out so the leaves won't stew and will be in perfect condition for a second or third infusion. It will also cool the water to the right temperature – for proper tea, an ideal temperature is around 85C.
Remember, leaf teas need a little longer to infuse than teabags. Teabags give up their paltry flavour in an instant. A tealeaf has so much more to offer and takes its time.
White and green teas don't really work with milk but with black tea, anything goes. It's entirely a matter of taste. The great thing about proper leaf tea is that it's delicious on its own or with milk.
Milk in first or second? It's up to you. I put it in second so I can tell how strong the tea will be by the colour. No doubt there will be some who disagree – do share your tea rituals.

Meatless Pilau with Potatoes

Rice dishes are popular and loved everywhere. They can be cooked with various ingredients like vegetables, beef, mutton or chicken. Also, there are many people who are vegetarians and do not consume any meat, be it red or white meat. 


Pilau is a rice dish which can be cooked either with meat or without. All it takes is a little creativity and you will have a delicious meal on your dining table. Therefore, this pilau recipe I am sharing does not contain any meat but is still as good as the more popular one.

Ingredients:
  • Washed rice
  • Pilau spices, either whole or ground
  • Crushed fresh garlic
  • Crushed fresh ginger
  • Potatoes, cubed
  • Salt
  • Cooking oil
A satchet of whole pilau is composed of dried cumin seeds, cinnamon, black pepper, cardamon and other spices. A small amount is taken then using a small mortar all the spices are crushed together with the fresh garlic and ginger.

Preparation:
  1. Put oil in a sauce pan and place on heat to warm it.
  2. Add the mixture of crushed spices, garlic and ginger to the oil. Cook for about two minutes.
  3. Add the potatoes and cook for a further five minutes then pour in enough water to cook the rice.
  4. Add salt then bring to a boil. Add the rice and cook till the rice is done and all the water has been absorbed. 
  5. Serve.

Pilau may be served with any type of vegetable salad. The salad helps in making the meal balanced by providing other nutrients like Vitamins. It may also be served with any type of soup or stew, all of which depends on one's desire.